Truffled garlic

By which I mean I have a great new way to thinly slice garlic for soups, sauces, and such. One of the Christmas gifts I received was this nifty Italian truffle shaver – essentially a miniature mandoline – and I used it for the first time just now as I ring in the new year making split pea soup with leftover Christmas ham. I tested three different thicknesses here:

P1010982

I doubt I’ll ever have a truffle in my kitchen, but now see-through, melt-away garlic slices by the dozen are just seconds away. No more scenes like this:

https://www.youtube.com/watch?v=yztx8qfoNu0

Caramel apple of my eye

P1010968w

Oh, yes, you will click this to see a larger version. You can’t not click it.

This year’s cider-baked ham turned out even better than last year’s, from eye appeal to moistness right through to flavour. That’s steam at the upper left immediately after its final glazing in the oven with highly-reduced cider, dark brown sugar, and freshly ground pepper. We tented this loosely and rested it for fifteen minutes before tucking in.

The big Christmas meal – traditionally on Christmas Eve in my house – was the ham, twice-baked potatoes with sour cream and Parmigiano-Reggiano, roasted corn, and cornmeal biscuits:

P1010972w

The twice-baked potatoes come under the fancy-sounding guise of Potatoes Suzette, even though the Kennedy White House recipe, served as part of a lunch with the Canadian Prime Minister, has only a few points in common with the original pommes de terre Suzette. The Americanised version is a sort of mish-mash of Suzette and Roxelane potatoes. My version includes more egg yolks, sour cream, and grated Parmigiano-Reggiano. The roasted corn was from Trader Joe’s freezer case and was better than I expected – their corn is nicely sweet and roasted well. The biscuit recipe comes from Cook’s Illustrated.

The ham itself, recipe also from Cook’s Illustrated, is made with nearly a gallon of cider (fresh, not fermented) with eight cups used with cinnamon and cloves for a several-hour brine, another cup inside the oven bag the ham is heated in, and four cups reduced for over an hour to a sticky, caramelly 1/3 cup. That 1/3 cup is used to paint the ham not just for more apple flavour but so the dark brown sugar-pepper mixture will stick properly to the ham during the final glazing at 400F/200C.

I’m happy to report that I got the smoked ham from the same place I got one last year, Blood Farm, which suffered a devastating fire in the middle of the night of 29/30 December 2013. The four-alarm blaze destroyed the building that housed the smokehouse, meat processing room, offices, and retail store, and the Blood family was initially unsure whether they would even attempt to recover. Hundreds of producers and customers and even people from the state of Massachusetts agricultural bureau convinced them to rebuild. An independent fund was set up to support idled employees in the intervening months. They finished the new building in September and the smokehouse restarted operations shortly after that. I also bought some of their fairly spectacular bacon when I picked up the ham last week.

Dessert has been delayed to today and will be Blueberry Grunt, a real favourite around here.

Great turkey stock, no waiting

I roast turkeys throughout the year, so I’ve learned a thing or two about those birds. The best trick I’ve come up with is a method of simultaneously roasting a turkey and preparing a quart of the finest turkey stock I’ve ever seen right underneath it – no four or five hours of simmering and reduction on the stovetop needed.

Outside of Thanksgiving, I often roast a turkey one night, allow it to cool somewhat, cover and refrigerate the whole bird – except for Quality Assurance slices, of course – and then get the meat off the next night for use in turkey sandwiches and sometimes for turkey tetrazzini*. In the past, each time I stripped the carcass, I’d notice the sizeable quantity of jelly that always covered the bottom of the bird. It’s a thick layer of well-set jelly, maybe a third of a cup’s worth. I knew that jelly was collagen melted from the connective tissue and bones – the source of gelatin – and that collagen is one of the keys to a fine stock, and wondered just how much was being evaporated away and wasted from the bottom of a dry pan. And so, I came up with this recipe to find out. The answer was “quite a bit.”

Recipe

To adjust for evaporation that will occur during roasting and basting, start with 5 cups/1.1 litre of water in the bottom of a roasting pan along with a bunch of roughly-chopped root vegetables and other stock components – in this photo, half a bag of baby carrots, a few celery stalks with their leaves, a few onions cut in quarters, several unpeeled cloves of garlic crushed with the flat of a chef’s knife, a few bay leaves, a small handful of whole black peppercorns, and some thyme:

stock1

Roast the turkey as normal on a rack above those – I often use Alton Brown’s 500F/260C for 30 minutes and the remainder at 350F/175C method – adding a little more water every now and then during roasting to keep the level of liquid to a quart or so, basting the turkey every twenty minutes. The basting is not to keep the turkey moist – because it doesn’t, really – but mainly to wash more collagen into the pan below, and it does also help crisp the skin. The only thing not to do is add more water to the pan in the last half-hour of roasting, when it dilutes the stock too much. At the end, you’ll have your turkey:

P1010044

And this liquid gold in the pan:

p1030216o

Strain the contents of the pan through a close-mesh strainer into a bowl, squeezing all the juices out of the veg with the back of a spoon or ladle, strain the resulting liquid once more through some cheesecloth into a quart container, then store that in the fridge overnight – or, if you want to use some or all of it immediately for gravy, use a fat separator such as this one and off you go.

If you go the chilling route, there will be a set layer of turkey fat on top, and, after you lift that off, you’ll find that the rest is a highly concentrated and gelled stock, shown below, that I think would make even a dour French chef secretly smile.

P1010064

*My turkey tetrazzini is chunks of white and dark meat with herbed sautéed mushrooms in a turkey velouté-based sauce Parisienne with Gruyère cheese added, served with freshly-made egg noodles in a casserole, an enhanced version of Tyler Florence’s recipe. Speaking of which, separately try that sautéed mushroom mixture made in the first part of his recipe on some sourdough toast. Delicious.

The menu (tentative)

  • Gougères with Gruyère for an appetizer – see the Petits Choux au Fromage link on this page
  • Roast turkey – with instant stock for gravy and, later, tetrazzini
  • Cornbread and slow-cooked bacon stuffing
  • Sweet potato “soufflé” (not really a soufflé, but quite light and fluffy…no, there’s no marshmallow)
  • Creamed corn or maybe something lighter, with Trader Joe’s pretty decent frozen corn
  • Something chocolate – maybe mousse, but my daydreaming right now features something I would be most thankful for: a from-scratch devil’s food cake with chocolate buttercream

Old-school butchers

They’re a rarity in Massachusetts, especially since Blood Farm’s fire last December, though the Blood family are nearly done rebuilding the combined smokehouse, processing, and retail building that was lost. At a Groton town meeting the other day, Elliot Blood said they’re planning a “soft” opening around the end of this month – meaning a grand reopening event is also in the works, I imagine.

There’s a place equidistant from my house that claims to be a butcher shop. It’s not. When they opened several years ago I went in there twice, once shortly after they opened to be disappointed and the second time a few months later – to see if they were still as dismal, not because I’m a glutton for punishment. They were.

Anyway, it sounds like I should be able to get one of Blood Farm’s delightful smoked hams for Christmas again this year. Here’s last Christmas’s cider-baked ham with deep-fried cauliflower and Julia Child’s Purée de Pommes de Terre à L’ail – that is, garlic mash, from Mastering the Art of French Cooking, Vol. 1, recipe at the end of this post. To me, there’s nothing better than raw garlic if you’re looking to ruin a batch of perfectly mashed potatoes, but slow-braising the garlic in butter first provides the perfect mellowing.

P1000843

In the meantime, I may visit Fairway Beef, which I recently found mentioned in an eGullet thread. It’s about 30 minutes from my office and sounds like my kinda place. Who knows, I might even be able to get some of the specialised cuts I can order at Blood Farm, though I strongly doubt Fairway sells goat or has bacon smoked over the other side of the building.

scroll

PURÉE DE POMMES DE TERRE À L’AIL (Garlic Mashed Potatoes)
Julia Child

Two whole heads of garlic will seem like a horrifying amount if you have not made this type of recipe before. But if less is used, you will regret it, for the long cooking of the garlic removes all of its harsh strength, leaving just a pleasant flavor. Garlic mashed potatoes go with roast lamb, pork, goose, or sausages. Although both garlic sauce and potatoes may be cooked in advance, they should be combined only at the last minute; the completed purée loses its nice consistency if it sits too long over heat.

For 6 to 8 people

2 heads garlic, about 30 cloves

Separate the garlic cloves. Drop into boiling water, and boil 2 minutes. Drain. Peel.

A 3- to 4-cup (small) heavy-bottomed saucepan with cover
4 tablespoons butter

Cook the garlic slowly — low heat — with the butter in the covered saucepan for about 20 minutes or until very tender but not browned.

2 tablespoons flour
1 cup boiling milk
1/4 teaspoon salt
Pinch of pepper
A sieve and wooden spoon, or an electric blender

Blend in the flour and stir over low heat until it froths with the butter for 2 minutes without browning. Off heat, beat in the boiling milk and seasonings. Boil, stirring, for 1 minute. Rub the sauce through a sieve or purée it in the electric blender. Simmer for 2 minutes more.  (May be done ahead of time. Dot top of sauce with bits of butter to keep a skin from forming. Reheat when needed.)

2 1/2 lbs. (just over a kilo) baking potatoes
A potato ricer
A 2 1/2 quart enameled saucepan (medium)
A wooden spatula or spoon
4 tablespoons softened butter (2 oz)
Salt and white pepper

Peel and quarter the potatoes. Drop in boiling salted water to cover, and boil until tender. Drain immediately and put through a potato ricer. Place the hot purée in the saucepan and beat with the spatula or spoon for several minutes over moderate heat to evaporate moisture. As soon as the purée begins to form a film in the bottom of the pan, remove from heat and beat in the butter a tablespoon at a time. Beat in salt and pepper to taste. (If not used immediately, set aside uncovered. To reheat, cover and set over boiling water, beating frequently.)

2 to 3 tablespoons heavy cream
4 tablespoons minced parsley
A hot, lightly buttered vegetable dish.

Shortly before serving, beat the hot garlic sauce vigorously into the hot potatoes. Beat in the cream by spoonfuls but do not thin out the purée too much. Beat in the parsley. Correct seasoning. Turn into hot vegetable dish.

A little bit of Heaven on Earth

I’m glad parislights asked for that Comfort Diner meatloaf recipe, because as it turns out, I was craving it. However, I stood firm in my solidarity with the Market Basket folks — notwithstanding all the slobbery anticipatory salivation, for which I apologised — and waited until I could once again get the ingredients at a sane price.

Inside the Heaven on Earth Meatloaf Co., Ltd. factory (click any image to view as a gallery):

Alton Brown’s spiffy creamed corn recipe is over here. Don’t skimp on the freshly-ground pepper in the creamed corn — there’s a sweet spot of exactly enough that will delight you when you hit it.

I miss her

JuliaChild

Photo: Paul Child

It’s been just over ten years since Julia Child left us here to cope with a planet made considerably poorer by the lack of Julia Child.

I owe a lot to her. She’s responsible for my love of cooking and baking, not to mention at least some of my attitude toward life, more probably a large part. She had such a lively disposition, and a devilish habit of speaking her mind regardless of whether there might be consequences. She wasn’t snarky, she was impish. She was – and is – my hero.

I first started watching her when I was a kid, probably right around the time of this episode of “The French Chef”:

https://www.youtube.com/watch?v=surrqHK28Oc

This sort of programme was still pretty revolutionary at the time. She probably presented ten times as much information on lobsters as anyone else on television had up to that point. Her thoroughness and breadth of knowledge fascinated me no end, and I remember thinking, “She is great. I want to be like her.”

The episode that really set itself firmly in my memory was when she made traditional French bread. When kneading, she would slam the dough onto the counter, raising great clouds of flour and clearly having a ball. When I did finally start making food for myself years later, that bread was what I remembered, and my first baking project was baguettes, using her detailed instructions in From Julia Child’s Kitchen, the first cookbook I ever owned. That they came out fantastically well guaranteed that I’d never stop, thank goodness. Had I failed miserably at that first attempt, there would be a more than middling chance that my life would be at least an order of magnitude poorer now. I didn’t fail because that’s how good she was at teaching and encouraging novices.

“The only real stumbling block is fear of failure. In cooking you’ve got to have a what-the-hell attitude.”

In years past, I saw her more than once just off Harvard Square, at the Church Street car park. Each time, I would wave and give a cheery hello, and she did the same. I never had one of her cookbooks with me, but I later wrote a letter of thanks to her and asked if she would sign my copy of The Way to Cook, which I included along with a postpaid box with which to return it. She did, and it is a treasured volume.

I miss her often. Whenever I do, I watch a few of the hundreds of hours of her shows that I have. She brings a smile every time.

A new rose was bred in 2004 and named after Julia Child. It is, of course, the colour of butter. A really good butter. She would have no less.

“Giving up butter means that in about two years you will be covered in dandruff.”


Comfort Diner meatloaf

Click for a larger version

Printing tip: At the bottom of each article on the site, a print/PDF/email function allows you to print or save a PDF of just the body of the article without any web site formatting. Scroll to the end of the article and find these icons: In the print dialog, you can click any element you don’t need to remove it from the printed/saved version.

parislights wanted to make this again and asked that I repost the recipe, so here it is…

This recipe from Manhattan’s Comfort Diner, with its unusual use of oats instead of bread crumbs, produces a delightfully soft-textured meatloaf that’s miles away from the mundane and typical dense-pack meatloaf that I find somewhat unpleasant.

The original recipe from The Comfort Diner Cookbook is below. Note: My changes to the recipe, which are substantial and I think important, are immediately below it.

Mom’s Meatloaf

Ingredients:

  • 3 tablespoons olive oil
  • 2 garlic cloves, minced
  • 1 cup finely diced white onion (1 medium-size onion)
  • 1 cup finely diced celery (2 to 3 stalks)
  • ¼ cup finely diced green bell pepper (from 1 bell pepper)
  • 1 tablespoon dried basil
  • 1 tablespoon dried thyme
  • 1 tablespoon dried oregano
  • 2 large eggs
  • 1 cup whole milk
  • 1 cup plain whole oats
  • 1 pound ground beef [80-85% lean]
  • ½ pound ground veal (if you don’t want to use veal, just increase the ground beef to 1 ½ pounds)
  • ½ pound ground pork
  • ½ tablespoon table salt
  • ½ tablespoon freshly ground black pepper
  • ¼ cup Worcestershire sauce
  • ½ cup canned diced tomatoes, drained
  • ½ cup ketchup or canned diced tomatoes, for topping

Directions:

  1. Preheat the oven to 325F/160C. In a large sauté pan on medium heat, warm the olive oil, then add the garlic, onion, celery, bell pepper, basil, thyme, and oregano. Sauté the vegetables for 3 to 4 minutes, until they begin to soften.
  2. In a bowl, whisk together the eggs and milk. Add the oats.
  3. In a large bowl, combine the meats well by hand. Season with the salt and pepper. Pour the liquid mixture over the blended meats and mix thoroughly to combine. Add the Worcestershire sauce, tomatoes, and sautéed vegetables. Mix well.
  4. Place the mixture in a 9×12 baking dish and form it into a long, rounded loaf. There should be at least 1 inch of space around the loaf to allow fat to run off.
  5. Spread the ketchup or diced tomatoes evenly on top of the loaf, and bake for 50 to 60 minutes, until firm and cooked through.
  6. Remove the meatloaf from the oven and allow to cool for 2 to 3 minutes before serving.

Here are my changes and baking notes:

  • Change: The herbs from dried to chopped fresh (I like the grassy note you never get from dried) and the peppers from green to a mix of sweeter bell peppers like red, orange, and yellow
  • Double: The onions and the herbs; you’re going to caramelize the onions, meaning two cups will reduce down to maybe two-thirds of a cup, and fresh herbs aren’t as intense as dried
  • Triple: The peppers (I use ¼ cup finely diced of each of the three colors)
  • Lower: The milk to 2/3 cup or the mixture is almost too sloppy to free-form.

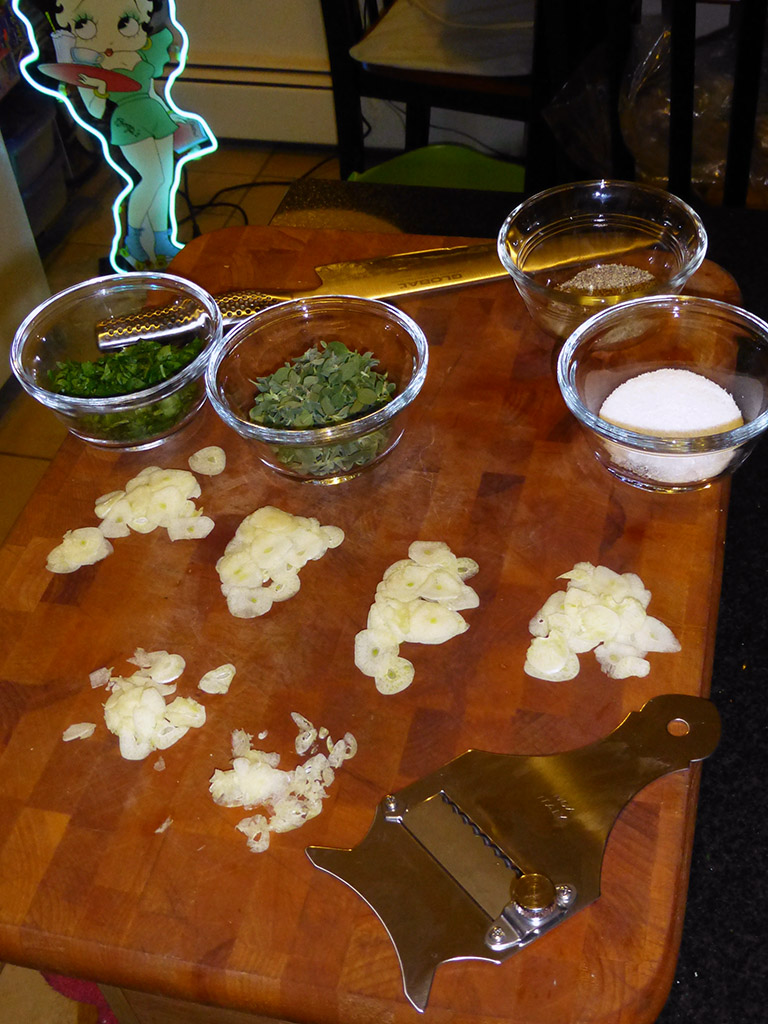
Here are the veg and herbs for the double recipe that I usually make. This amount cooks down to about three cups in the end.

Sautéing the veg substantially changed:

  • Caramelize the onions in the olive oil on a medium-high heat to a mahogany color, stirring frequently so they don’t burn; I double the quantity because they shrink to almost nothing. This is going to take a while – don’t believe the majority of TV chefs and recipes that tell you caramelizing onions takes 10 or 12 minutes, because someone else did it for them and they haven’t done it themselves for many years – or they’re just lying because no one wants to hear it takes half an hour. In any case, it’s worth your time.*
  • Add the celery and diced peppers when the onions are about 2/3 done
  • Add the garlic only in the last couple of minutes to avoid burning it
  • Add the herbs to the sauté only in the last minute
  • You may find that the mix gets a little too dry during this extended sauté – if that’s the case, add a bit more oil or some oil and butter

*There is a method out there that uses baking soda to supposedly speed-caramelize onions, but I found it saves only a few minutes. Worse, even the tiniest quantity seems to break the onions down so much that you end up with onion mush…nicely colored, sure, but mush. It’s a cynic’s view, I’ll admit, but I think some of the sites propounding this method just might be using traditionally caramelized onions in their photos, because no one wants to see a mound of mush.

This is what your elixir will look like after sautéing. Your house smells good now, too, doesn’t it?

Tips:

I usually combine the milk, eggs, and oatmeal in a bowl before I start sautéing the veg and herbs. By the time the veg are done, the oatmeal has soaked up a good bit of the liquid, which makes for easier mixing.

You may need to adjust the seasoning, so make a small, thick patty from an ounce or two of the finished mixture and sauté it over medium heat, turning frequently, to an internal temp of 160F/72C so you can safely taste it. E coli is hardier than some critters and lives right up to 150F/65C, so for this recipe, a probe thermometer should be your close friend. The right internal temperature is especially important in the finished loaf. I use a TempTest 1, a sort of compact version of the same company’s more well-known Thermapen, but much cheaper ones like their Super-Fast pocket model, an Oxo instant read you can pick up at Bed Bath & Beyond, or this Taylor from Amazon – the one I use at my office – are similarly accurate, just not as fast as the more expensive models.

If you make two loaves at a time as I usually do, your mis en place is probably going to take about 35 minutes if you’re fairly proficient – 45 if you’re also making mash from a boatload of potatoes. Let’s call it an hour if you further add a passel of carrots. There’s a helluva lot of stuff to peel, dice, and slice when you make two loaves and a couple of sides.

Baking changes:

Line a pan with heavy duty tinfoil and put a fairly close-mesh wire rack in the pan. Fold a piece of heavy duty tinfoil to the size of the loaf you intend to form (about 10×5″) and place on the rack. When you put the loaf on this, it will stop the mixture squidging through the rack underneath but will also allow the fat to drip off into the lined pan below as the meatloaf cooks. This way, it’s not swimming in its own fat at the end.

If the mixture is on the loose side – and it almost certainly will be – you can refrigerate it for a few hours or overnight before forming, or be brave and form it anyway, then get it out of the oven at about fifteen minutes and, using a couple layers of food prep gloves to avoid burning yourself, push the sides in to get its height back. I’ve done that more than once, but I don’t recommend it.

These days, I always do all the prep one evening, chill the finished mixture overnight, and bake it for dinner the next night after a day of delightful anticipation. I think the finished flavor is improved when the ingredients have plenty of time to insinuate themselves upon each other overnight, but the real bonus is that all you have to prep the next night is your vegetable sides. It’s a very satisfying method.

For this double recipe, I refrigerated the mix overnight to firm it up nicely, then packed half at a time into a loaf pan and unmolded onto the foil islands on top of the wire rack like so. When the mixture is well-chilled beforehand, the loaves don’t slump at all in the oven.

The meatloaves on their foil islands shortly after going in the oven, holding their shape nicely after chilling overnight

In my experience, the 50 to 60 minutes in the recipe well underestimates the baking time. It’s more like 80 to 90 minutes when you have a properly tall loaf. Just use an instant-read thermometer to ensure the very middle of the loaf is 160F/72C. Any little critters that may have been along for the ride will be pushing up teeny-tiny daisies by then.

I don’t paint the ketchup on top until baking is about three-quarters done, when the internal temperature is past 120F/50C (don’t forget to wash the thermometer probe afterward). This way, it still darkens and thickens nicely, but doesn’t form the almost burned crust of the original recipe. The result:

Click for a larger version

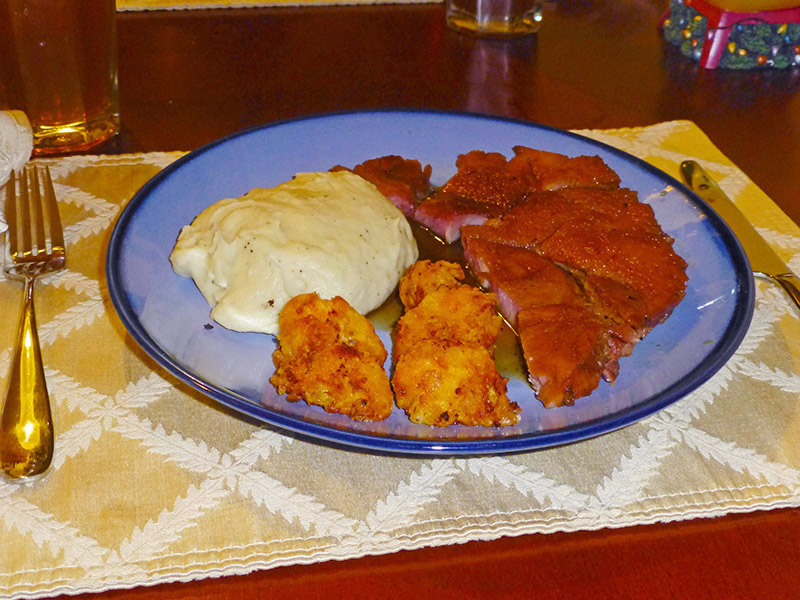
Sides that go well with this (they’re all in that picture at the head of the article):

  • Julia Child’s garlic mashed potatoes, recipe here (scroll halfway down that page); even without the garlic sauce, mashed done her way is the best way. The key is the drying of the potatoes over low heat after ricing or mashing and before adding the butter and cream. (Sometimes, instead of the slow braising of the garlic in that recipe, I cut the bottoms off two whole heads of garlic, drizzle with olive oil, wrap in foil, and roast in a 400F/200C oven for half an hour, then simply squeeze the tamed and softened cloves into the mash.) Keep tasting the mashed as you add salt and pepper until it makes you go “Mmmm.”
  • Carrot coins braised in butter, just barely bubbling on medium-low heat until tender, then glazed with a touch of brown sugar and garnished with a handful of the carrot’s close cousin, parsley. I usually peel and slice about 3 pounds, which needs two sticks of butter to partially cover the carrots; stir it occasionally as it braises. Serve with a slotted spoon so you don’t have a puddle of butter on the plate.
  • Alton Brown’s Better Than Granny’s Creamed Corn, recipe here. Be sure to add plenty of freshly ground pepper at the end, tasting continually – you’ll know it immediately when you’ve hit the sweet spot.

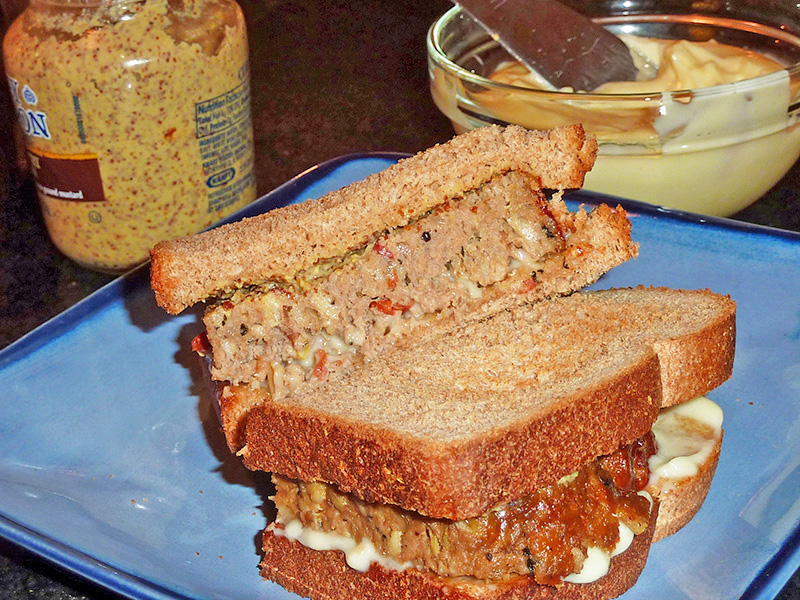
What do do with leftovers: Heat thick slices and serve on lightly toasted whole wheat slathered with grainy mustard and mayo.

meatloaf 3

Feeling ambitious? Make some of this for your sandwiches:

mayo

Homemade Mayonnaise

All you do is whisk together these six things in a medium sized bowl (tip: wet a kitchen towel, form it into a circle, and place your bowl onto it for stability while whisking):

1 egg yolk
1 teaspoon water
½ teaspoon salt
A few grinds of white pepper
1 ½ teaspoons lemon juice
1 teaspoon apple cider vinegar

Then, using a Pyrex glass measure with pouring lip or something similar, whisk in 1 cup of oil (I often use canola), by drops at first to start the emulsion, then a thin stream, then a thicker stream, whisking briskly all the while. Then you adjust seasonings as necessary. And you look at the clock and just four or five minutes has passed since you started.

It almost seems too simple to produce something so tasty and useful. In fact, it’s so good and so easy that you may look out the window to see if the Commercial Mayonnaise Police are outside, waiting to break your door in whilst shouting, “What’s all this, then?!”

If you’re familiar with Trader Joe’s mayonnaise, this is much the same in flavor. If you prefer the taste of Hellman’s/Best mayonnaise, you can cut back on the lemon juice and add some mustard powder.


Edited November 2018 to add this even easier method that you can use if you have a stick blender:

2-Minute Stick Blender Mayonnaise

In a jar just wider than your stick blender, place:

1 egg yolk
2 teaspoons water
1/2 teaspoon table salt
1 teaspoon apple cider vinegar
1 1/2 teaspoons lemon juice (if you like a little less tang, lower this to 1 teaspoon)
1/4 teaspoon mustard powder or a teaspoon of mustard
A few grinds of white pepper or black pepper

Carefully pour one cup of neutral vegetable oil like canola on top of those.

Place the stick blender all the way on the bottom of the jar, making sure it encloses the egg yolk.

Pulse the stick blender for a second or two, then wait a second or two. As you repeat this, you will see the emulsion start to form at the bottom. Repeat this pulse-wait cycle eight or ten times. At this point, you are likely to have some oil still sitting on top. Slowly raise and lower the blender to incorporate the rest of the oil.

Sticks to the ribs

My birthday dinner last night was baby back ribs slow-braised at 250F/120C in wine, Worcester sauce, honey, and garlic, then hickory-smoked and finished with a glaze of barbeque sauce barked at high temperature under the grill; dauphinoise potatoes à la Jeffrey Steingarten; and bi-colour sweetcorn pretty fresh off the field in Harvard, Massachusetts – the town, not the university. We ate quite late (note bathrobe) and were stuffed, so dessert, a Maine blueberry grunt with vanilla ice cream, was deferred to tonight and is steaming on the stovetop now.